Configure cXML system
To set up the system, you must go to the detailed settings. To do this, you must either click on the “Technical name” or on the “ID” on the overview page.

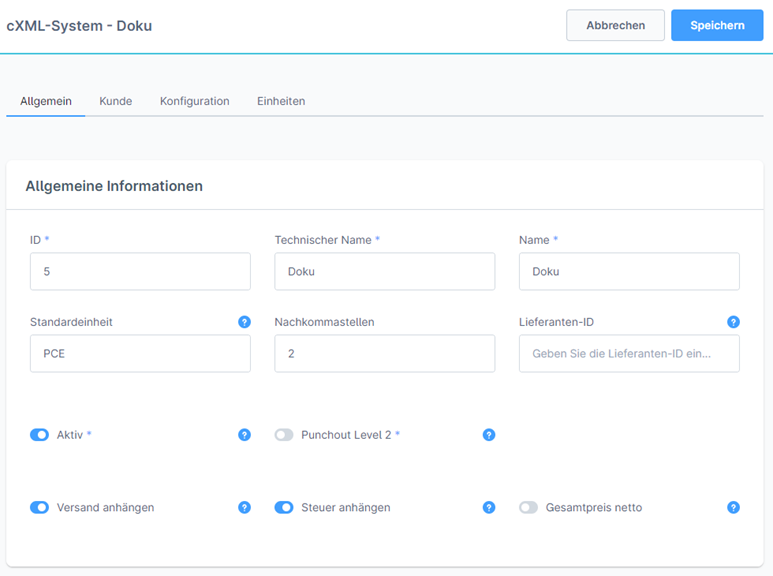
This will take you to the first page of the system (“General” tab). Here you can configure the general data of the system, the system license key and the credential parameters (login parameters). To edit the data, you must first click the “Edit” button at the top right. The fields can then be edited.

Auf dieser Seite:
1. Tab 'General'
General Information
| Field name | Description |
|---|---|
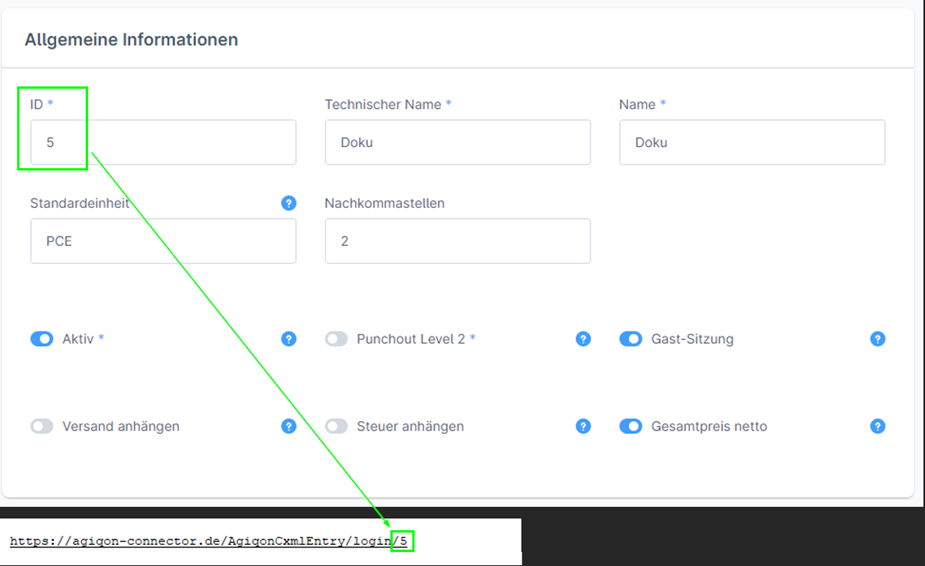
| ID | ID for the system. Is relevant for the Punchout URL, as this must also be specified. |
| Technical name | The technical name must be unique. Relevant for technical things. |
| Name | Name to be able to identify the system in the overview. |
| Standard unit | Serves as a final fallback if no unit of measurement has been specified for the items, but the customer system requires a unit of measurement. |
| Decimal places | Specifies the decimal places for decimal number values. |
| Active | Indicates whether the system is active. When creating a new system, the value is set to inactive by default. |
| Punchout level 2 | If active, the level 2 functionalities should be available for the system. |
| Attach shipment | If active, the shipping is transferred within the cXML structure in the 'shipping' element (not as a product, as this is shown as a separate item in the standard cXML structure). |
| Attach tax | If active, the tax is transferred within the cXML structure in the 'tax' element (separate item, as this is shown in the standard cXML structure). |
| Total price net | If active, the total price is transferred as a net value. |
License
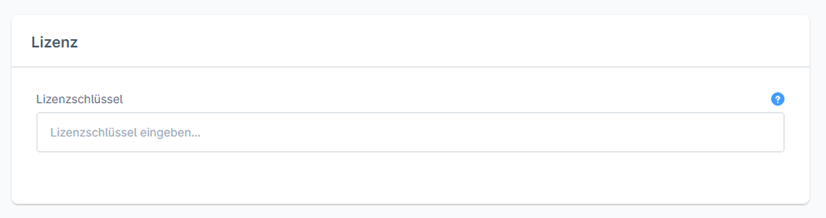
You can find further information on depositing a system license for your cXML system at Assign cXML liceses
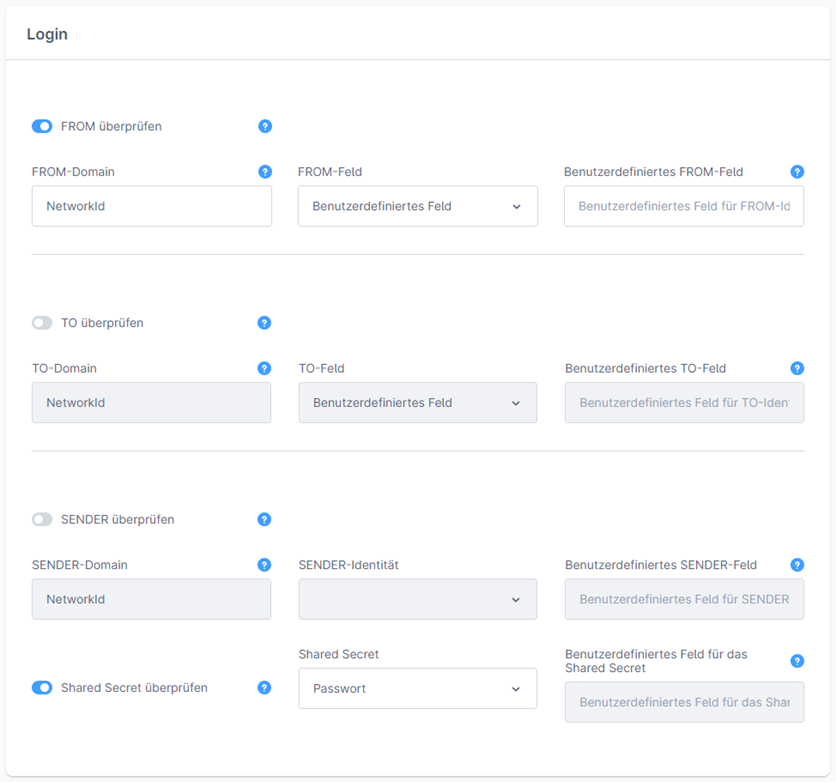
Login
| Field name | Description |
|---|---|
| Check TO | If active, the TO credentials will be checked (additional security option, the FROM credentials are more important). The TO credentials are, so to speak, the store's authentication data for the ordering system (you should receive these from your customer if in doubt). |
| Check FROM | If active, the FROM credentials will be checked (should always be active). The FROM credentials are, so to speak, the authentication data of the ordering system in the store (you should receive these from your customer in case of doubt). |
| FROM domain | Domain of the FROM credentials (normally there are two options that are used here: NetworkId (Ariba in normal cases) and DUNS (Coupa in normal cases)) |
| FROM field | Specifies the field from which the value for the FROM credentials is taken.
The following options are available:
|
| User-defined FROM field | The technical name of the additional field at the customer from which the FROM value is to be taken is entered here. |
| TO-Domain | Domain of the TO credentials (normally there are two options that are used here: NetworkId (Ariba in normal cases) and DUNS (Coupa in normal cases)) |
| TO field | Specifies the field from which the value for the TO credentials is taken. The following options are available:
|
| User-defined TO field | The technical name of the additional field on the customer from which the TO value is to be taken is entered here. |
| Check SENDER | If active, the SENDER credentials are checked. This method is often not used. If you do need to use this method, your customer will let you know. |
| SENDER domain | Domain of the SENDER credentials (normally there are two options that are used here: NetworkId (Ariba in normal cases) and DUNS (Coupa in normal cases)) |
| SENDER identity | Specifies the field from which the value for the SENDER credentials is taken. The following options are available:
|
| User-defined SENDER field | The technical name of the additional field on the customer from which the SENDER value is to be taken is entered here. |
| Check shared secret | If active, the shared secret is checked. This option should always be active for security reasons. |
| Shared secret | The field from which the value for the shared secret is then taken is specified here.
The following options are available:
|
| User-defined field for shared secret | The technical name of the additional field on the customer from which the password is taken is entered here. |
Example of the Punchout URL to be passed on: Punchout URL → For cXML systems, the ID for the cXML system must be added to the end of the URL.
2. Tab "Customer"
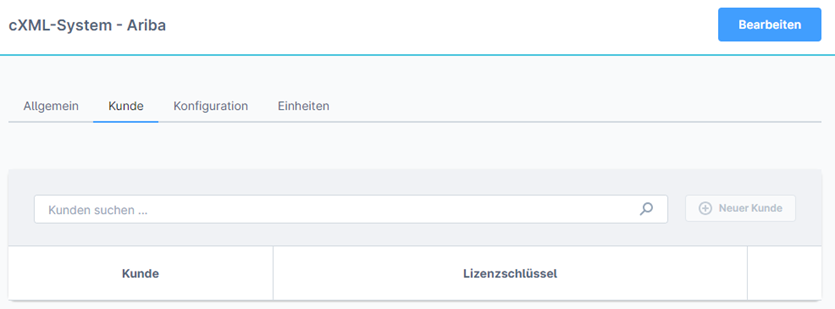
You can find more information on depositing a system license for your OCI system at Assign cXML licenses
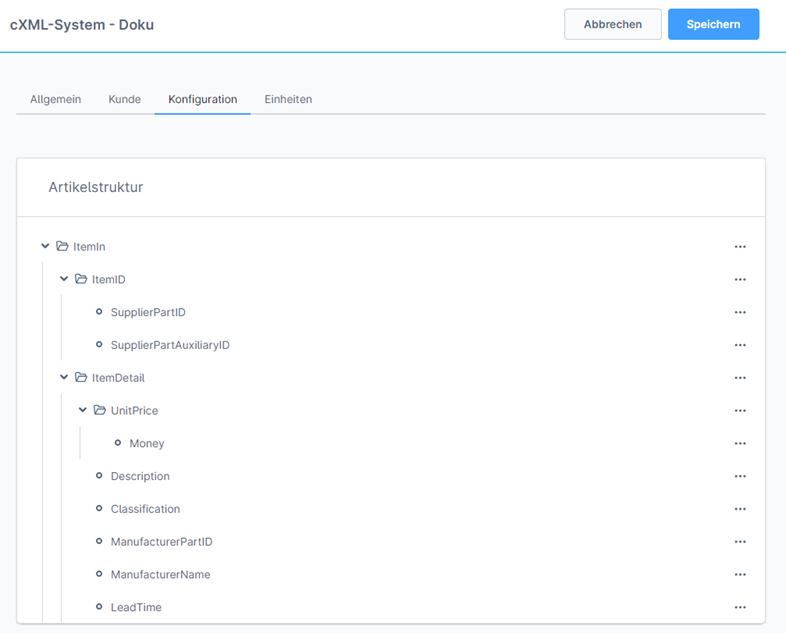
3. Tab "Configuration"
Additional fields can be added to the cXML transfer here.
Note: We recommend that you do not remove the fields that have already been created, as otherwise we cannot ensure that the cXML transfer works correctly! Additional fields can be added, but the basic structure should be retained.
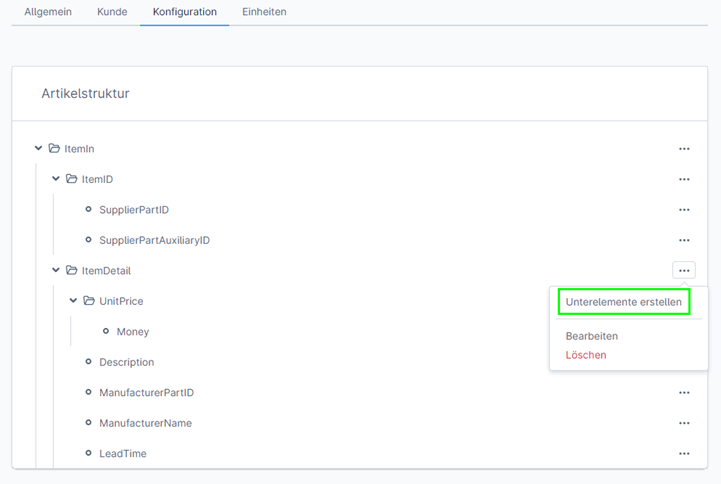
You can add further sub-elements (and therefore fields) by clicking on the three dots at the back (or on the name at the front) and then clicking on “Create sub-element”. A pop-up will then open in which the field can be configured. The same applies if you click on “Edit” for a field.
A sub-element is always inserted into the structure, which means that if you want to insert something under “ItemDetail”, for example, you have to click on the three dots there.
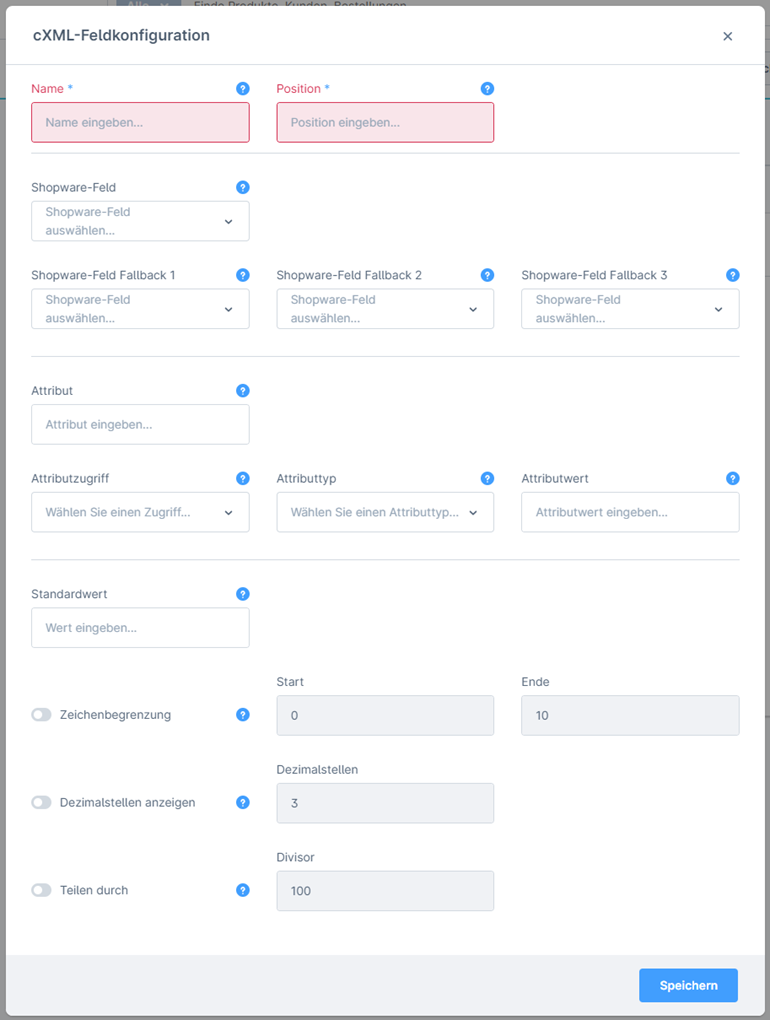
| Field name | Description |
|---|---|
| Name | Name of the field in the transfer |
| Position | Specifies the position within the transmission |
| Shopware field | Here you can define which value should be transferred from a shopping cart / product field from Shopware to the customer system. A list of the fields can be found below. If a static default value is to be transmitted, leave the field empty and enter something under “Default value”. |
| Shopware field fallback 1 | A fallback value for the “Shopware field” field can be entered here. This value is used if the field is empty or does not exist. If a static default value is to be transmitted, leave the field empty and enter something under “Default value”. If no further fallback is required, simply leave it empty. |
| Shopware field fallback 2 | Fallback for fallback 1 If a static default value is to be transmitted, leave the field empty and enter something under “Default value”. If no further fallback is required, simply leave it empty. |
| Shopware field fallback 3 |
Fallback for fallback 2 If a static default value is to be transmitted, leave the field empty and enter something under “Default value”. If no further fallback is required, simply leave it empty. |
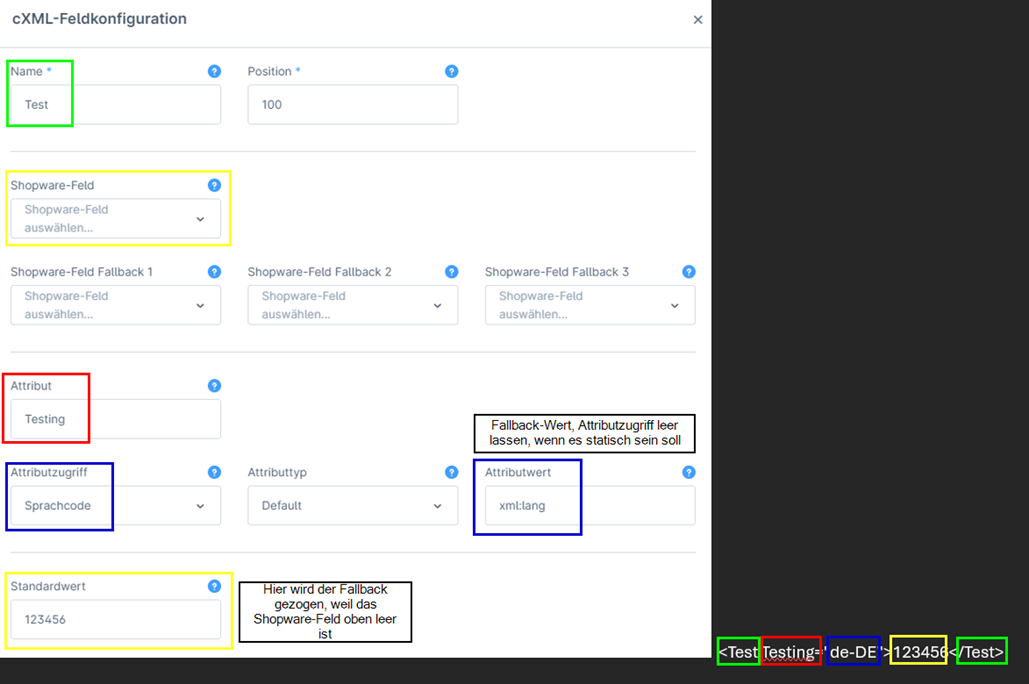
| Attribute | Enter the name of the attribute here (for example “v:domain” or “v:xml:lang”). ➔ An example of the attributes can be found after the table |
| Attribute access | Here you specify what should be inside the quotation marks. Can also be left empty, in which case the value from “Attribute value” is used (also serves as a fallback if empty). ➔ An example of the attributes can be found after the table |
| Attribute type | If the attribute is to be like “v:xml:lang”, select the namespace. Otherwise, select Standard. If you are not sure, select Standard. ➔ You can find an example of the attributes after the table |
| Attribute value | This is where you enter what should appear before the “=” if the “Attribute access” field is empty. ➔ An example of the attributes can be found after the table |
| Standard value | A static value can be entered here, which then applies to all transferred products. Can be used as a fallback and as a basic standard. If no further fallback is required, simply leave empty. |
| Character limit | If activated, a character limit can be specified here. In the first field, you can specify the character from which it should start. In the second field, enter the character after which everything should be cut off. |
| Show decimal places | If activated, the number of decimal places can be defined here (for number fields). |
| Divide by | The field value is divided by the value entered in the “Divisor” field. For example: The field value is “5” and the divisor is “10”, then the value “0.5” is displayed. |
Selection values for “Shopware field” and “Attribute access
| Fieldname | Description |
|---|---|
| Total product price | Total price of the item in the shopping cart (quantity × unit price) |
| Unit product price | Unit price of the item |
| Product quantity | Quantity of the item |
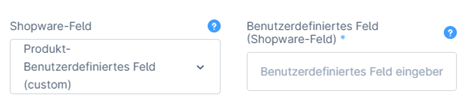
| Product - User-defined field (custom) | Any additional field you wish can be stored here. To do this, you must enter the technical name of the additional field in the “Custom field (Shopware field)” field. The field only appears if the value for the custom is selected at the front.
➔ See image below the table |
| Product - User-defined field (agicon_oci_me_class) | This option takes its value from a field on the product that is created by the plugin. For example, the eClass number can be entered on the product here. |
| Product - User-defined field (agicon_oci_me) | This option takes its value from a field on the product that is created by the plugin. The unit of measurement from the customer system can be entered in this field (e.g. piece = PCE). The field is directly on the product, but there is also an option to store the unit directly on the unit of measurement in the Shopware backend. |
| Product description | Standard Shopware product description (standard language) |
| Product EAN number | Standard Shopware field for the EAN |
| Product height | Standard Shopware field for the height |
| Produkt ID | Database ID of the product |
| Product length | Standard Shopware field for the length |
| Product manufacturer number | Standard Shopware field for the manufacturer number (on the product) |
| Product name | Shopware Product name (standard language) |
| Product packaging unit | Standard Shopware field for the packaging unit |
| Product packaging unit (plural) |
Standard Shopware field for the plural of the packaging unit |
| Product number | Shopware product number |
| Product unit | Standard Shopware field for the unit of measurement |
| Product tax | Tax rate |
| Translated product description | Standard Shopware product description (language of the sales channel) |
| Translated product name | Shopware product name (language of the sales channel) |
| Product weight | Standard Shopware field for weight |
| Product width | Standard Shopware field for width |
| Manufacturer name | Standard Shopware field for the manufacturer (only name in the standard language) |
| Translated manufacturer name | Standard Shopware field for the manufacturer (only name in the language of the sales channel) |
| cXML system unit extension | Here, the value assigned in the “Units” tab is transferred to the Shopware unit of measurement (if the unit of measurement is maintained for the product). If this is not maintained for the product, for example, a fallback can be defined in the “General” tab in the “Standard unit” field (or in the field configuration itself). |
| ISO currency code | ISO code of the currency selected in the sales channel (if more than one is available in the store; if only one, then logically the value of the store currency). |
| Standard cXML system unit | 'Default unit' field in the ‘General’ tab |
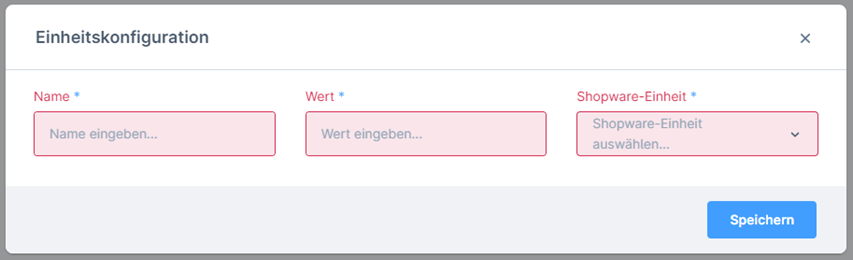
4. Tab "Units"
Under Units, you can store values for the Shopware units of measurement, which are then transferred to the customer system instead of the Shopware units of measurement. Default values can be defined as described above in the field configuration via “Default value” or via the “Default unit” field in the “General” tab.
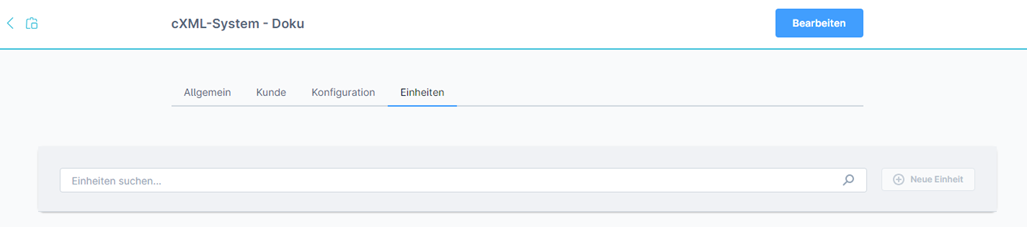
Units of measurement can be mapped using the “Edit” button and the “New unit” field. Note: Of course, units of measurement must first be created in Shopware (under “Settings” ➔ “Units of measurement”) so that they can be mapped (otherwise use the default unit).
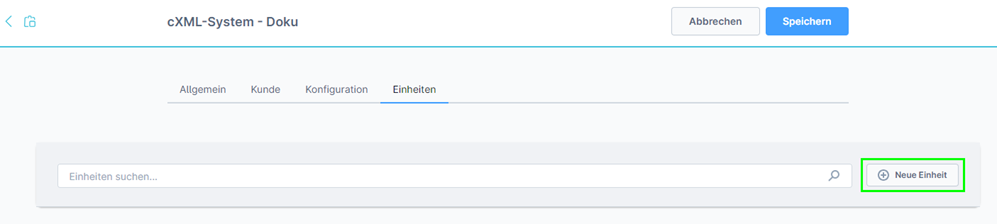
A pop-up will then open in which you can carry out the mapping.
| Field name | Description |
|---|---|
| Name | Specification of a name for clarity in the table |
| Value | Specification of the value to be transferred for the unit of measurement |
| Shopware unit | Selection from the existing Shopware units of measurement (mapping) |